
How 3D Printing works
The Vision, Innovation and Technologies Behind Inkjet 3D Printing
Introduction
As every designer knows, there’s magic in transforming a great idea into a tangible and useful object you can hold in your hand. It can be a consumer good on a store shelf, a critical component of an industrial machine, or even an early physical prototype that unveils your new idea to the world.
Physical prototypes — basic and blocky or wonderfully realized in shape, texture and color — go far beyond drawings or computer models to communicate your vision in a dramatic way. They empower the observer to investigate the product and interact with it rather than simply guess what it might be like. Before the product is ever produced, people can touch it; feel it; turn it left, right and upside down; and look inside. They can test it, operate it and fully evaluate it — long before the finished product is brought to market.
Until recently, a quick and affordable physical prototype has been an oxymoron. Obtaining prototypes wasn’t quick. it meant contracting with a fabricator who handcrafted them or used a complicated stereolithography machine. in either case, it took weeks, and it wasn’t affordable. You were billed thousands of dollars for your trouble.
And who needs just one prototype? Successful product developers revise a design repeatedly until they approach their ideal. Physical prototypes available on demand in ample quantities accelerate the design process, and more quickly send a better product to market.
This ideal is in fact a reality for some of the world’s most accomplished and demanding designers and engineers. Available within a couple of hours of hitting “print” on a quiet, clean and sleek machine in an everyday office setting, on-demand prototypes today help engineering organizations:
• improve communication within the product development organization;
• shorten design cycles;
• put superior products on the market ahead of the competition;
• stretch R&D dollars;
• improve accuracy;
• eliminate costly mistakes;
• trigger unexpected ideas;
• drive innovation and quality; and
• improve collaboration among engineering, sales, marketing and the executive team.
This paper will cover the inception and evolution of 3D printing; then explore in depth how a 3D printer produces a physical model; and finally, examine the defining attributes of a Z corporation 3D printer and the technology decisions that produced them.
The evolution of 3D Printing
this reality of affordable on-demand prototyping was first conceived by visionaries at Mit who in 1993 developed the fastest and most affordable method of prototyping — 3D printing. Upon Z corporation’s founding in 1994 by some of these same visionaries, we promised to put on-demand prototyping within the reach of every designer or engineer. This promise would entail developing 3D printers that would follow the footsteps of document printers and quickly evolve to deliver speed, affordability, accuracy, color and usability.
We are working to keep that promise:
First Generation —3D printing arrives
In 1996, we introduced the Z®402, the market’s first 3D printer, redefining speed and affordability in rapid prototyping. Later versions like the Z402c and Z406 introduced multicolor 3D printing for more vivid and informative models when needed.
Second Generation – Improved performance, affordability and color
Our release of the ZPrinter® 310 in 2003 introduced breakthrough speed, a simplified user experience and unprecedented affordability. in 2005, the spectrum Z ™510 redefined 3D printing with a new generation of high-resolution printing and vivid color.
Third Generation – Focus on ease of use
In 2007, the ZPrinter 450 kicked off the third generation of 3D printers with a focus on ease of use and office compatibility. the automated, self-contained, all-in-one (print, depowder) solution improved convenience and office-friendliness. it was followed by the ZPrinter 650 in 2008, with increased size and performance, and the ZPrinter 350 in 2009, which introduced a new level of 3D printing affordability. these printers increased the accessibility for new classes of users.

How Does 3D Printing work?
The fundamental purpose of a 3D printer is to quickly transform an idea into a physical object. that idea is usually first embodied in a 3D computer model created in 3D CAD software like solidworks®, Autodesk® inventor® or Pro/engineer.
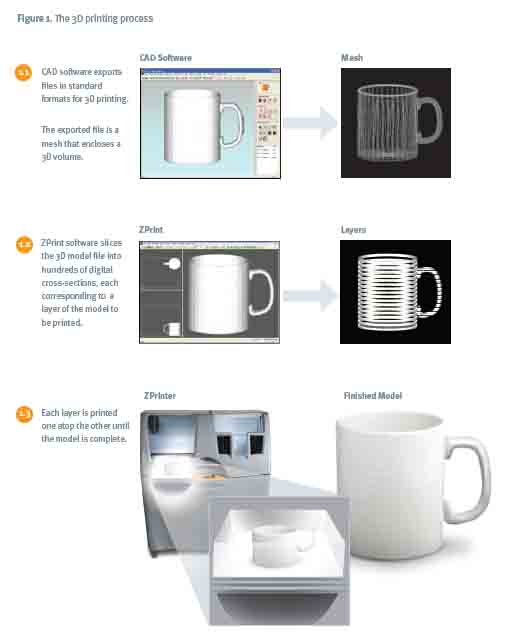
All of these software tools export 3D models as files in standard formats for 3D printing, including .stl, .wrl (vrMl), .PlY, .3Ds and .ZPr. the exported file is a mesh, or series of triangles oriented in space, that enclose a 3D volume. this mesh must be “water tight” so that the model is a solid, not just surfaces that may not have any thickness (see figure 1.1 on page 5). in other words, the design at this point must be ready to exist in the real world, not just on a computer.
with the file now in a printable format, you launch ZPrint™ software on your Pc. using ZPrint, you can scale up or scale down the file you wish to print, orient the part in the build chamber, and direct the 3D printer to print multiple versions of the part in the same build (with or without variations).
Then ZPrint slices the 3D model file into hundreds of digital cross-sections, or layers. Each 0.004 inch (0.1 mm ) slice corresponds to a layer of the model to be fabricated in the ZPrinter (see figure 1.2).

When ready to start the print job, you click “3D Print.” this sends the digital layer files to the ZPrinter, and the model begins printing immediately.
The ZPrinter prints each layer, one atop another, as the physical part is constructed within the build chamber of the machine. We’ll detail how the ZPrinter accomplishes this task next. Once the ZPrinter completes the final layer, a short drying cycle runs. Then the physical object can be removed (see figure 1.3).
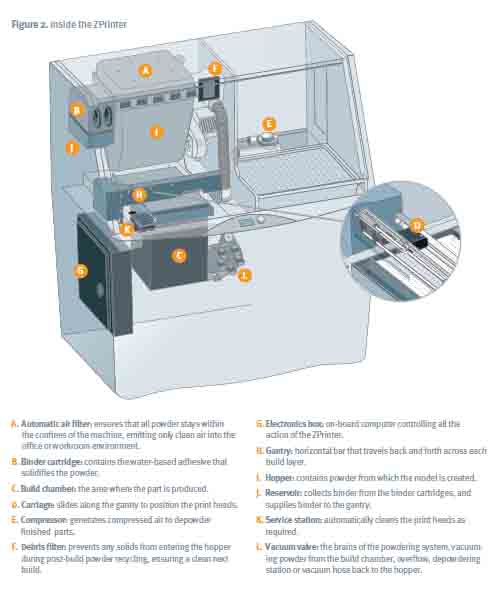
systems overview our 3D printing process is automatic, and thus easy for any user. still, a lot is taking place under the hood. this section provides an overview of the ZPrinter system and the steps involved in printing a 3D physical model. we will refer to the 3D printer diagram in figure 2 as we detail the 3D printing process.
The printing cycle
Our 3D printing process is clean and highly automated. All the steps described here take place without any input from you.
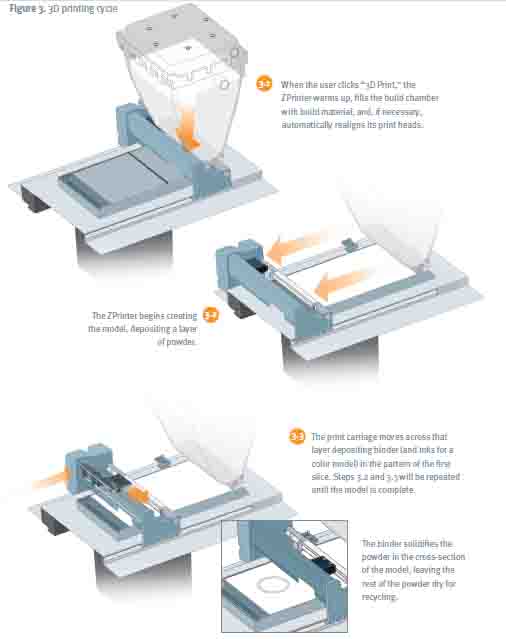
• Preparation — once you click on “3D Print” from ZPrint, the printer initiates a pre-build routine. First, it warms the air inside the printer to create the optimum operating environment for 3D printing. At the same time, the machine fills the build chamber with a 1/8th inch (3.18 mm) layer of powder so that the parts, when finished, rest on this powder for easy removal. The machine may also run an automatic head alignment routine. This routine consists of printing a pattern onto the powder, reading the pattern with an electronic eye, and aligning its own print heads accordingly (see figure 3.1 on page 8).
• Printing — once the pre-build routine is complete, the printer immediately begins printing the layers created in the ZPrint software. the machine deposits powder from the hopper in the back of the machine, spreading a thin 0.004 inch (0.1 mm) layer forward across the build platform (see figure 3.2). The print carriage then moves across this layer, depositing binder (and various inks for a color model) in the pattern of the first slice that was sent from ZPrint. The binder solidifies the powder in that cross-section of the model, leaving the rest of the powder dry for recycling (see figure 3.3). At this point, the piston below the build chamber lowers the powder bed 0.004 inch (0.1 mm), preparing for the next layer (see figure 4.1 on page 9). The cycle repeats itself until the model is complete (see figure 4.2).
• Depowdering/recycling — when finished, the model is suspended in powder to cure. At the end of the curing time, the machine automatically removes most of the powder from around the model by applying vacuum pressure and vibration to the bottom of the build chamber. The loose powder is pneumatically conveyed through the system, filtered, and returned to the hopper for use in subsequent builds (see figure 4.3). Next, you open the front of the machine and move the part to the fine- depowdering chamber. Here you spray the part with compressed air to remove any last traces of powder (this material, too, is automatically vacuumed back into the ZPrinter and recycled for future use). All of the powder that enters a ZPrinter eventually becomes a model. None is wasted or lost. All powder loading, removal and recycling is part of a closed-loop system supported by persistent negative pressure for containing airborne particles within the machine.

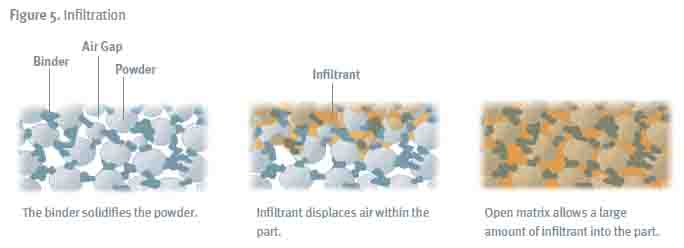
Once all traces of powder are removed from the part, it can be used as is or undergo a post-process treatment for further strengthening or improved finish. This process is referred to as infiltration, and deciding whether or how to infiltrate depends on your use of the model. Our infiltration options are all safe, clean, quick and effective.
infiltrants are a secondary resin material that is typically drizzled or brushed onto the surface of the model. The infiltrant fills the microscopic pockets in the model, sealing its surface, enhancing color saturation and improving the mechanical properties of the model as it cures (see figure 5).
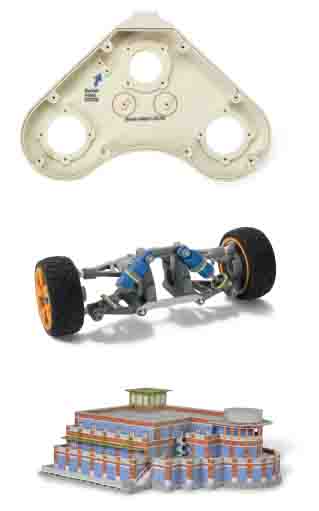
You have a variety of options for infiltrants depending on your needs. Options include water for basic requirements such as display models, Z-Bond for general purpose concept modeling and Z-Max epoxy for functional prototypes or real-world parts. Z-Max-based prototypes have been used as production parts in underwater robotics applications, as pounding mechanical feet in footwear testing, and as functional auto parts in operating engine compartments.

Technology based on delivering speed, affordability, ease of use, accuracy and color
Our 3D printing process is a result of early, deliberate and far-reaching technology decisions based on criteria we knew would be most important to you, including speed, affordability, and ease of use, accuracy and color.
Speed
Prototypes lose their value if you have to wait too long for them to appear, so “time to part” is a key metric in 3D printing. From the beginning, we pledged to deliver the fastest possible on-demand prototyping technology so that you could create an object in hours instead of days. ZPrinters can create models at a rate of one vertical inch (25 mm) per hour, meaning a team can print several handheld-size parts two inches (50 mm) tall in just a couple of hours.
We made several pivotal technology decisions to achieve that speed goal. First, we based our additive fabrication technology on high-throughput inkjet printing. This allows ZPrinters to employ a raster (versus vector) approach to 3D printing. In raster- based action, the print head encompasses multiple jets — 300 per half-inch (12.7 mm) — to quickly cover a half-inch (12.7 mm) swath with each pass. Prototyping technologies that employ a vector approach use just one nozzle and must draw the entire cross-section of the part, one narrow line at a time. The ZPrinter raster method is comparable to a state-of-the-art inkjet document printer, versus the plotter technology of the 1980s. Plotters painstakingly draw every line of every letter in every word of text.
A second speed factor is our method for distributing build material. By spreading the primary build material (powder) over the build platform to start, rather than forcing it from a nozzle, ZPrinting is extremely efficient and fast. The ZPrinter dispenses only binder through the print heads. The alternative approach, depositing 100 percent of the build material through a single nozzle (or even multiple nozzles), takes as much as five times longer. Additionally, by having loose powder support parts during the build process, ZPrinters do not require disposable support structures – pegs and posts that support walls, planes and overhangs during printing and curing. This means no time is wasted constructing them.
Another factor contributing to the ZPrinter’s speed is the ability to create multiple models in a single build and to “stack” the parts in the build chamber. the ability to nest multiple parts in a build, combined with speed, determines throughput, which is perhaps the most important measure of productivity. A ZPrinter can create 15 baseball-sized models in a single five-hour build. Because of its throughput, a ZPrinter 650 operating around the clock could produce over 2,000 similar-sized prototypes in a month.
With our 3D printers, you can take advantage of the entire build area to produce parts, and you can do so with only one setup procedure, further reducing the total number of builds and processing time.
The ZPrinter’s higher throughput ultimately enables you to review more prototypes in quicker succession, producing a higher quantity of iterative designs, resulting in richer innovation and better products reaching the market. And there is no queue of engineers waiting their turn to have their designs printed.
Affordability
To bring instant prototyping within the reach of every designer and engineer, 3D printing needs to be affordable. Here, too, we made key development decisions early to make ZPrinting the most affordable method of creating physical prototypes from concept through production.
Affordability starts with a low-priced machine. Because the ZPrinter borrows from the consumer inkjet printing space, its price is within reach of most design organizations. The equipment does not require expensive lasers, complex thermal controls or special facility requirements.
Second, ZPrinting combines its low purchase price with affordable plaster powder used widely in other industrial applications. The ZPrinter makes the most of this resource by transforming every bit into a usable prototype. No build material is wasted on supporting the model during building (loose powder, prior to recycling, supports the model as it cures). All powder not consumed in producing the model is automatically recycled, filtered and replaced in the hopper for future builds.
Third, we offer infiltrant choices for a wide range of applications, one of which is virtually free. Our water cure process requires only epsom salt diluted in tap water and spritzed onto the surface of a newly ZPrinted part. Water cure uses safe and non-toxic materials that require no expensive protective containers, ventilation or special disposal methods.
Ease of maintenance is another Z corporation strategy for containing cost. Standard off-the-shelf inkjet printing technology and a modular design make component replacement quick and easy, minimizing costly downtime.
Considering all costs involved, the total expense for finished models is about $2-$3 USD per cubic inch ($0.12-$0.18 USD per cubic centimeter) on the ZPrinter 350 and ZPrinter 450. This cost includes all of the variable costs associated with running the printer and finishing models: powder, binder, infiltrant and even the replaceable print head that is used during printing. Your precise final cost depends on the geometry and infiltrant choice.

Affordability is one of the most important factors in making rapid prototyping accessible to everyone. With the low cost of operation, you don’t have to consider the cost of each model you produce any more than you worry about the cost of each sheet of paper you print on a document printer. Your focus can be on the design.
Ease of use
Our vision of making on-demand prototyping accessible to everyone requires that printing a model be almost as easy as printing a document. We envisioned that every designer, engineer, intern or student should be able to ZPrint a prototype. And like a document printer, a 3D printer should be perfectly compatible with a professional office environment.
To achieve these goals, the ZPrinter automates operation at nearly every step. This includes setup, powder loading, self-monitoring of materials and print status, printing, and removal and recycling of loose powder. The ZPrinter is quiet, produces zero liquid waste and employs negative pressure in a closed-loop system to contain airborne particles. Powder and binder cartridges ensure clean loading of build materials. Plus, an integrated fine-powder removal chamber reduces the footprint of the system. All of these advances mean that no special training is required, and the “hands on” time for operating the 3D printer is just a few minutes.
You control the ZPrinter from either the desktop or the printer. ZPrint software lets you monitor powder, binder, and ink levels from your desktop, and remotely read the machine’s LCD display. The on-board printer display and intuitive interface enables you to perform most operations at the machine. Plus, the ZPrinter runs unattended during the printing process, requiring user interaction only for setup and part removal.
Accuracy
Accuracy in a physical model is critical to communicating what the actual finished product will be like. A model that looks and feels like the real thing is convincing and compelling, and also reduces the painful costs of design errors.
The ZPrinter’s accuracy results from a combination of print-head technology, build materials and mechanical design. A finely tuned electronic system controls the printing action with the utmost precision. Speeding around the build chamber a few millimeters from the powder, the print head accurately and precisely deposits binder and color in the areas indicated by the ZPrint software. The process delivers details as small as 0.004 inch (0.1 mm) and structural walls as thin as 0.02 inch (0.5 mm). The accuracy of the entire process is similar to the accuracy of basic injection molding.
Color
Although geometric accuracy is important, there are times you may want prototypes in realistic color. In addition to communicating the finished look of the part, color can communicate finite element analysis (FEA) results, manufacturing steps or separate parts of an assembly. It can also be used to print text, logos, or an engineering label on the surface of a part for easy identification.
The ZPrinter delivers color capabilities using technology similar to that of document printers. The ZPrinter converts any color from the RGB (red, green, and blue) space used on a PCto a CMYK(cyan, magenta, yellow, and black) color value for printing. It then orders up the right combination of CMYKdrops to be placed in the same area, using dither patterns to blend these elements into any color.
To print in color, ZPrint software requires a file that contains color information in addition to the geometry information. Since the .STLfile format does not include color, several other file formats are accepted: .3DS, .WRL(VRML), .PLY, .ZPRand others that include color information. Z Corporation’s ZEdit™ Pro software enables you to add color, colored textures and labels to 3D model files. The operating costs of color are surprisingly affordable. The ZPrinter colors only the shell of an object, not the hidden interior volumes, using ink only where it’s needed.
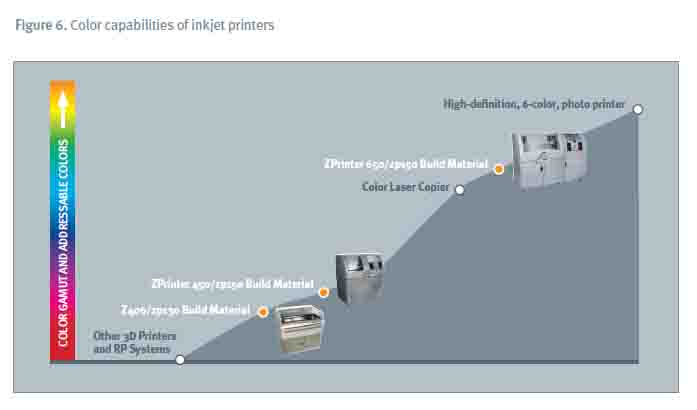
We have invested heavily in R&D to maximize the range (or gamut) of colors that can be produced. As Figure 6 shows, the ZPrinter’s color capabilities have steadily progressed since the introduction of color 3D printing in 2000. Today, ZPrinters can produce 90 percent of the colors on the Adobe® Photoshop palette — and, uniquely, can print any combination of colors onto a single object.
These pivotal technology decisions have enabled us to achieve our goal of bringing realistic 3D printing to every designer or engineer.
Conclusion
Our careful technology decisions over the past decade and a half have given you and every other designer and engineer the option to have quick, affordable access to realistic 3D models.
This on-demand access enables you to improve your designs and get products to market more quickly than ever.
Best of all, 3D printing has not even approached its apex. Quite to the contrary, 3D printing is paralleling 2D printing’s evolution, becoming faster, easier and more robust while declining in price. With a history of results to back it up, we are committed to remaining at the vanguard of this progress.